How to Make Your Own Christmas Table Decoration:
There’s something truly magical about a Christmas table that’s been dressed with festive foliage, candles and thoughtful details. Whether you’re hosting Christmas dinner for family, preparing a party table, or just adding a bit of seasonal cheer to your home, a handmade table decoration can be the centrepiece that brings everyone together.
In this guide we’ll walk you through easy, practical steps to create your own Christmas table decoration — from gathering your greenery to simple styling tips that will bring your design to life.
What You’ll Need
Before we begin, here’s a simple list of materials that make this project achievable even for beginners:
-
A sturdy base — like a tray, shallow box, or elongated dish
-
A selection of fresh greenery (e.g. fir, pine, eucalyptus, holly)
-
Florist foam or oasis (optional, but super helpful)
-
Candles (pillar or taper, depending on your style)
-
Decorative accents (pinecones, baubles, berries, ribbons)
-
Floral wire or twine
-
Pruning shears or sharp scissors
Tip: Choose fresh, fragrant foliage — it not only looks good, it smells amazing too!
Step 1: Choose Your Base
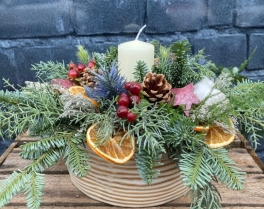
Your base sets the tone for your design. A rustic wooden tray gives a country feel, while a sleek ceramic dish creates a more modern look. Make sure it’s sturdy — especially if you plan to include candles.
If you’re using floral foam, soak it in water first and place it securely in your base. This helps keep your greenery fresh and makes arranging easier.
Step 2: Start with Greenery
Begin by layering your foliage around the base. Fir and pine make great structure, while eucalyptus and holly add texture and colour contrast.
As you add each piece, think about balance — you don’t have to be perfect, but aim for an even spread that feels full without overcrowding.
Pro tip: Place your longest pieces at the ends and shorter pieces toward the centre to create a gentle curve that follows the shape of your table.
Step 3: Add Candles Safely
Now for the atmosphere! Candles bring warmth and light to your decoration. Tuck pillar candles into the greenery or, for a more formal look, use candle holders and arrange taper candles evenly along the centre.
Always place candles securely and make sure they’re stable. Never leave burning candles unattended, especially near foliage.
Step 4: Decorative Touches
This is the fun part — personalising your décor! Add pinecones, berries, mini baubles, dried orange slices or cinnamon sticks. These accents not only look beautiful, but bring scent and seasonal character to your table. We have a huge selection in our shop.
Try grouping similar elements in small clusters rather than scattering them randomly. This creates intentional focal points that draw the eye.
Step 5: Finishing Flourishes
When you’ve got your layout just right, step back and take a look. Does it feel balanced? Are there any gaps? Fill as needed with a few extra sprigs or smaller accents.
Consider tying a ribbon around your tray or weaving it through the greenery for a festive touch — even a simple bow can make the whole design feel more polished.
Quick Styling Tips
-
Keep it low so your guests can see each other across the table.
-
Mix textures — soft eucalyptus with rigid pine and shiny baubles looks great.
-
Repeat colours (e.g. red berries and red candles) to create harmony.
-
Think scent: cinnamon sticks, orange slices, and rosemary sprigs all add natural fragrance.
Your Own Signature Style
The beauty of making your own Christmas table decoration is that it becomes uniquely yours. Whether you lean into traditional green and red, go minimalist with whites and silver, or take inspiration from nature with pinecones and muted tones — your creation sets the mood for your celebration.
We’d love to see what you make! Tag us on social media or pop into the shop for inspiration and fresh materials — we’re always happy to help.
Merry Christmas and happy decorating! 🎄